The workflow
You can configure one or various workflows for a project.
Basically, the goal of a workflow is to represent a process in the form of steps and to restrict the progression of tasks from the start step to the end step by meeting certain conditions.
The workflow feature allows you to define the process steps, the transitions between steps, as well as the constraints associated with the steps and/or transitions.
Only members with project administrator rights can create and/or modify a workflow.
In this article, you will first learn how workflows are visible by the user, then how to configure a workflow.
Workflow presentation in the Beesbusy project
Workflow selection in the task
You can have multiple workflows active on a project. Therefore, for each task, you must specify which workflow is assigned to it.
In the task’s Workflow tab, a drop-down menu allows you to choose the workflow for this task, or no workflow at all:
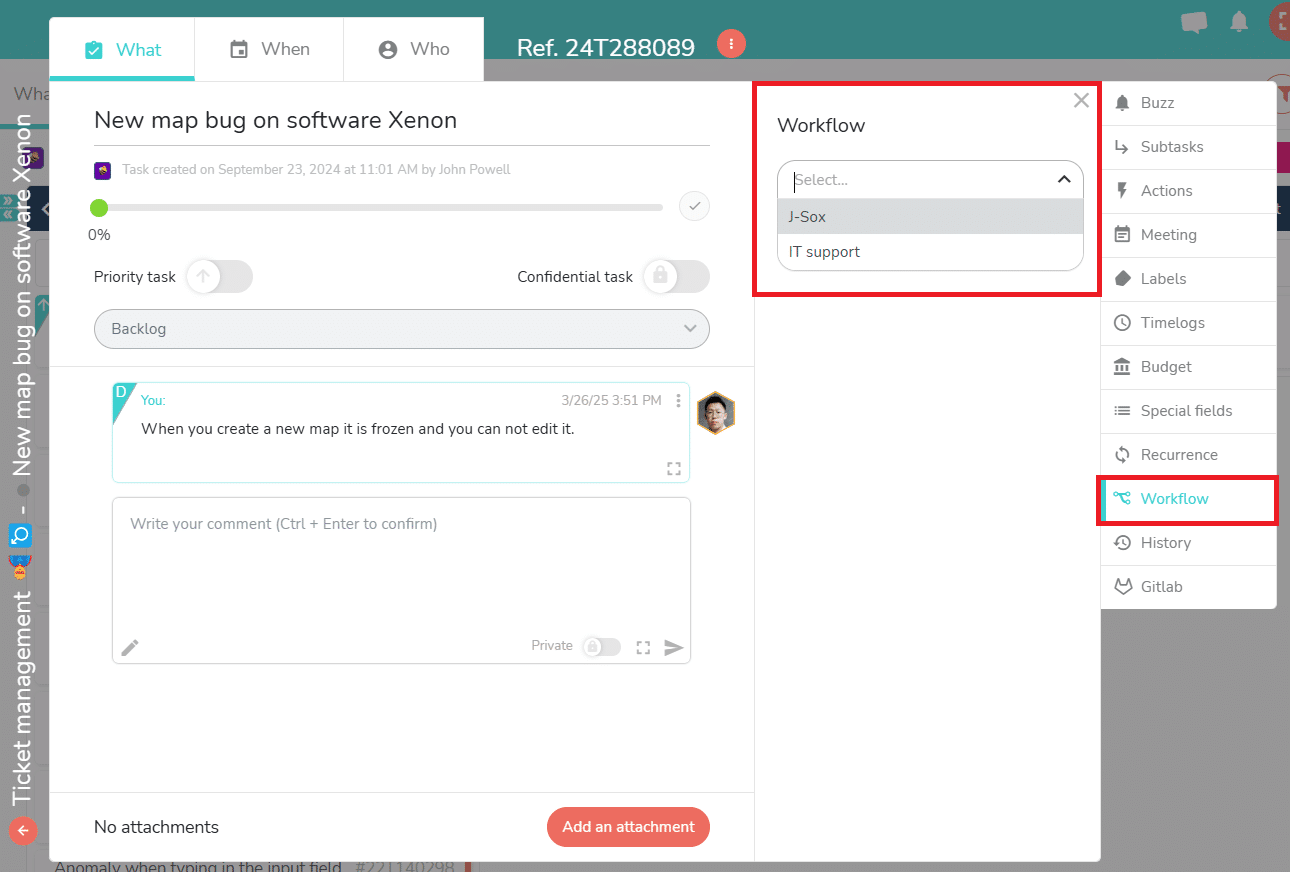
Good to know: there is a configuration option that allows you to choose a workflow that will be assigned by default to all new tasks created in the project. This avoids having to select a workflow task by task if a single workflow applies to the entire project.
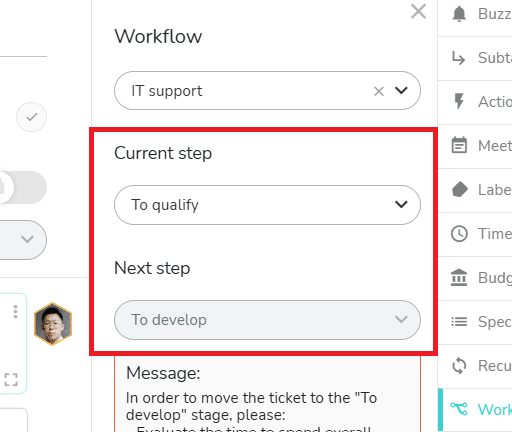
Reading the workflow steps in the task
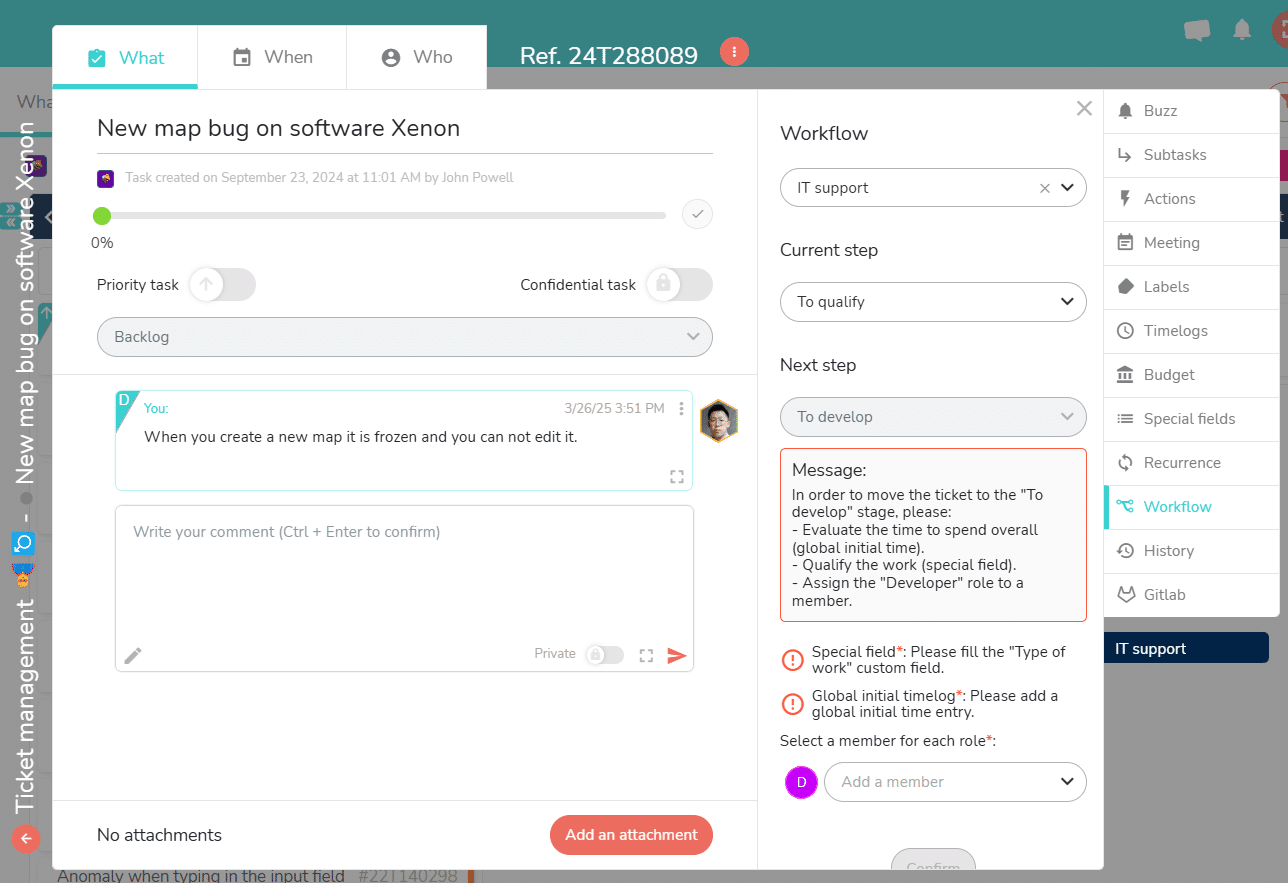
Once you have chosen the workflow, the task’s side panel shows you the workflow step the task is in, as well as the next step:
Actions to perform to move to the next step
If actions to move to the next step have been configured, they are listed under the name of the next step:
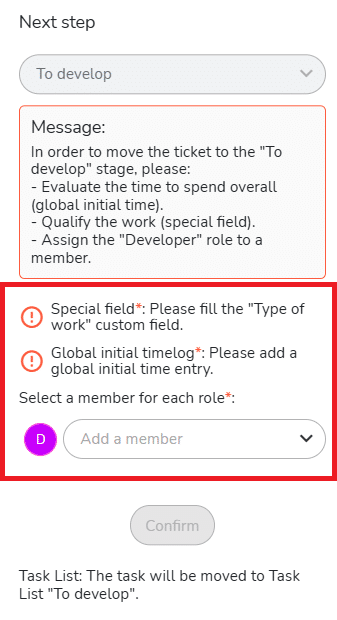
These actions have a red star to the right of their name if they are mandatory. In the case of mandatory actions, the “Confirm” button is only clickable once the actions have been completed.
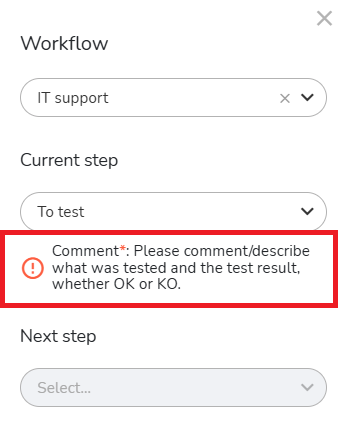
Actions to perform in the current workflow step
If the workflow asks you to perform actions in the current step, the actions to perform are displayed below the name of the current step and above the name of the next step:
Now that you have seen these main user interface elements, you will now discover how to create and then configure a workflow.
Creating and configuring the workflow
Creating the workflow
How to create a workflow?
Go to the project settings, “Workflow” section.
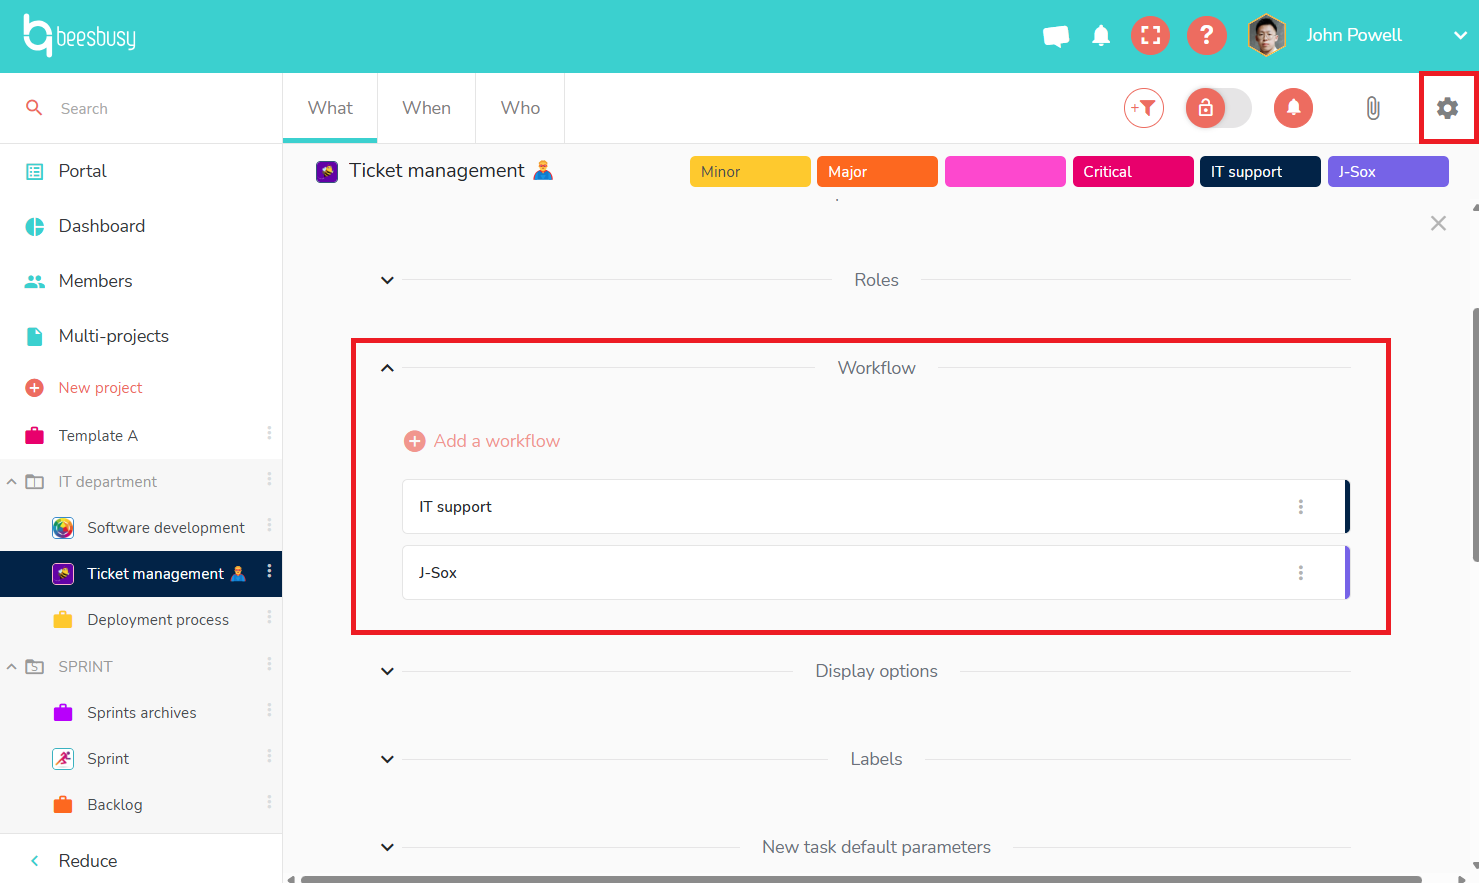
If workflows have already been created, they will appear in this section.
If you want to create and configure a new workflow, click “Add a workflow.”
A “New workflow” window will then appear, with several fields to complete:
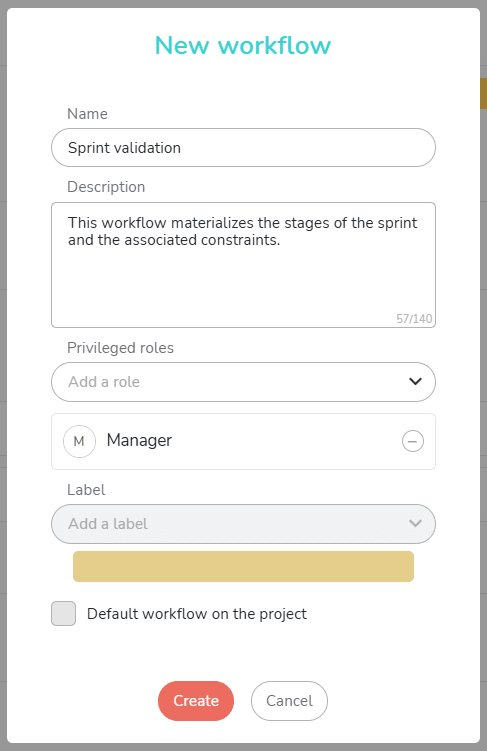
Only the “Name” and “Description” fields are required.
If you have roles on your project, you can designate one or more “Privileged Roles” here. Members with a default role on the project will be able to override workflow constraints if their default role is designated as a privileged role here. If you want to know more about roles, see the article on roles by clicking on the following link: https://www.beesbusy.com/resources/features/tasks/roles/
You can choose a label to more quickly visualize, within the project, which workflow is assigned to which task. This is particularly useful if there are multiple workflows active on the project, and therefore not all tasks follow the same workflow.
The “Default workflow on the project” checkbox, as its name suggests, automatically assigns the relevant workflow to any new task created in the project.
Click “Create” to validate these elements and begin configuring the workflow.
All these elements can be modified later by clicking on the 3 small dots to the right of the workflow name, then on “Edit”.
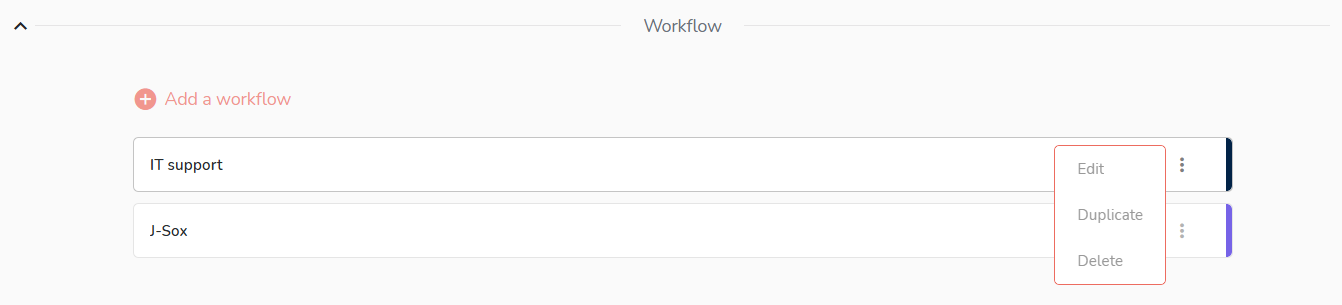
As you can see, it’s also possible to duplicate or delete a workflow via this menu.
Structuring the workflow
Here are the elements that make up a workflow:
- A start step and an end step.
- One or more intermediate steps.
- Transitions between these steps.
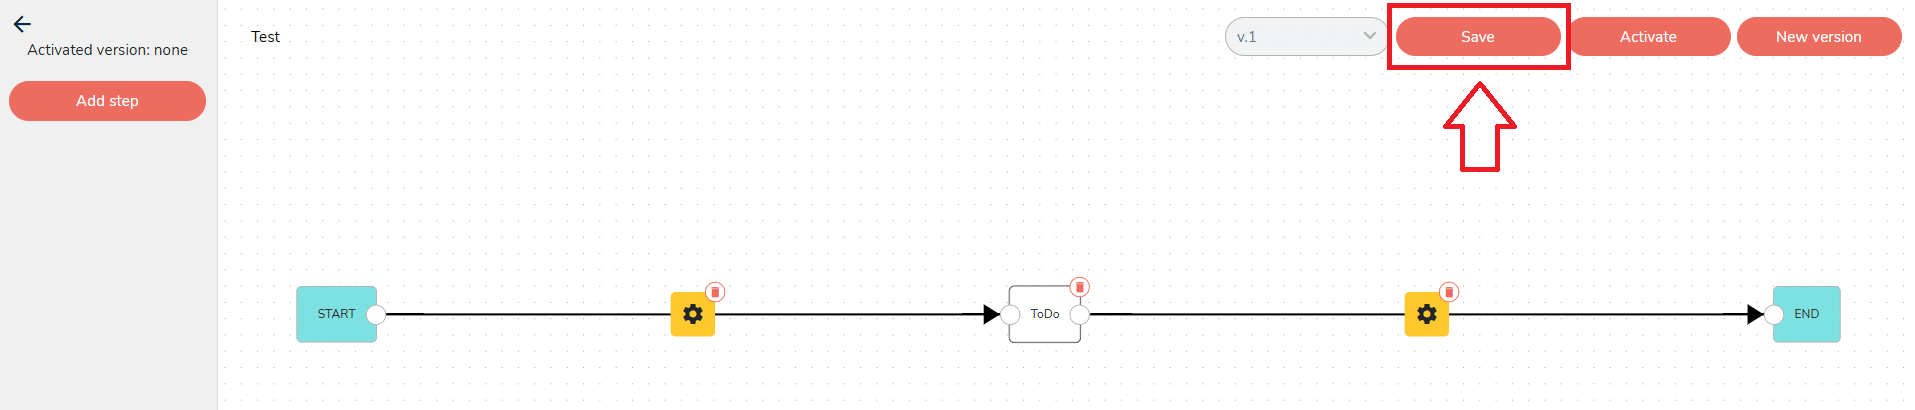
These are the three elements that are presented to you by default when creating the workflow:

Click the “Add step” button located at the top left if you wish to add a step:

You can drag and drop the steps to position them in the desired order.
When you link one step to another by dragging the circle to the right of the step name, the transition appears automatically.
Here’s an example workflow with a few additional steps:
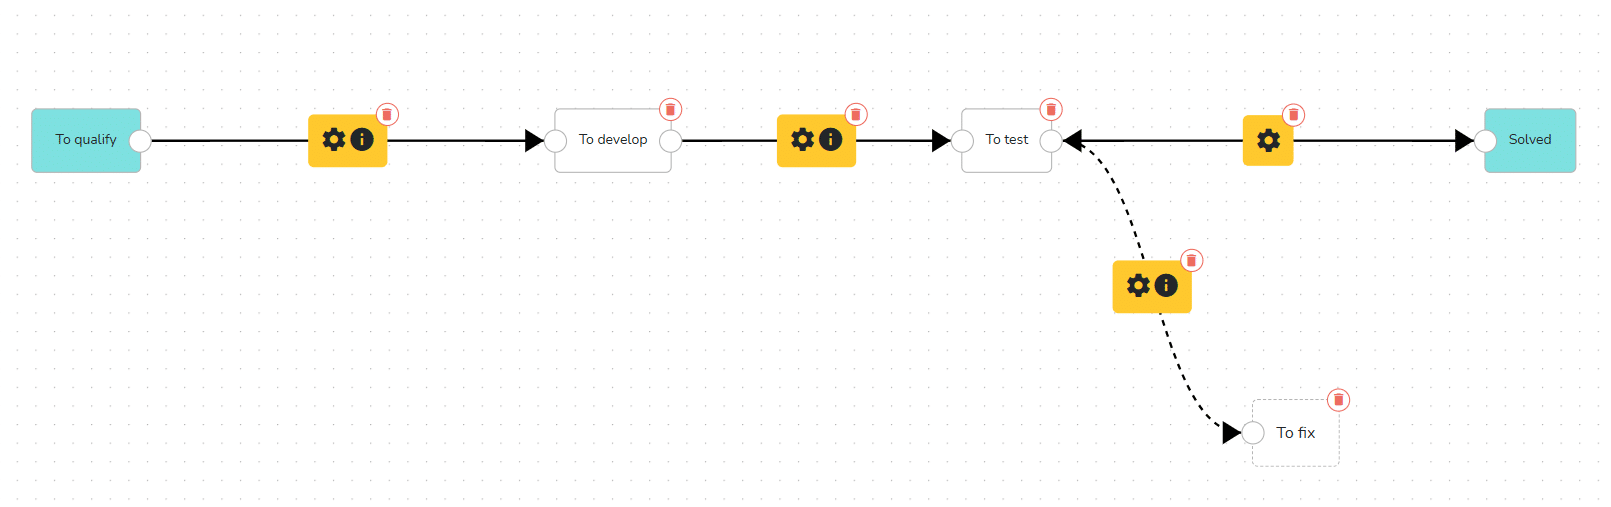
As you can see from this example, a step can be followed by multiple steps of your choice. In the task, you will then have to choose which step the task should go to when leaving the current step:

Remember to regularly click on the “Save” button at the top right so as not to lose your work setting up your workflow:
Configuring transitions
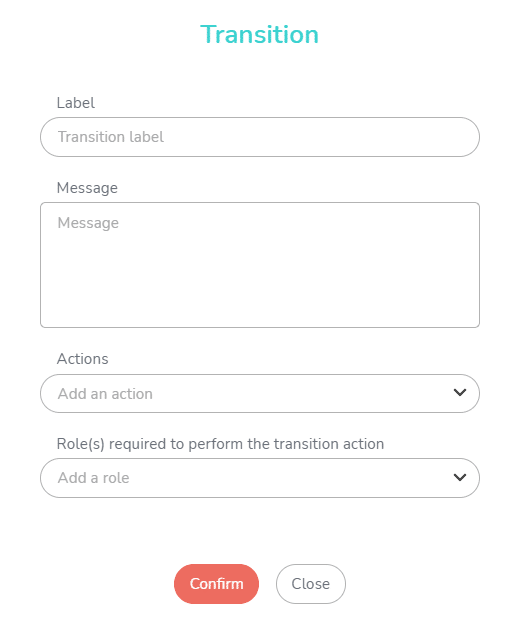
When you click on a transition, the transition settings window opens:
The first 3 elements of the transitions will be visible to the user, in the “Workflow” side panel of the task:
The “Label” field
The transition label is what appears as the name of the next step in the task side panel.
The “Message” field
The transition message is displayed in the message box of the side panel. It plays a fundamental role in helping users understand the actions to be performed.
The “Actions” field
The actions to be performed, whether optional or mandatory, are displayed below the message.
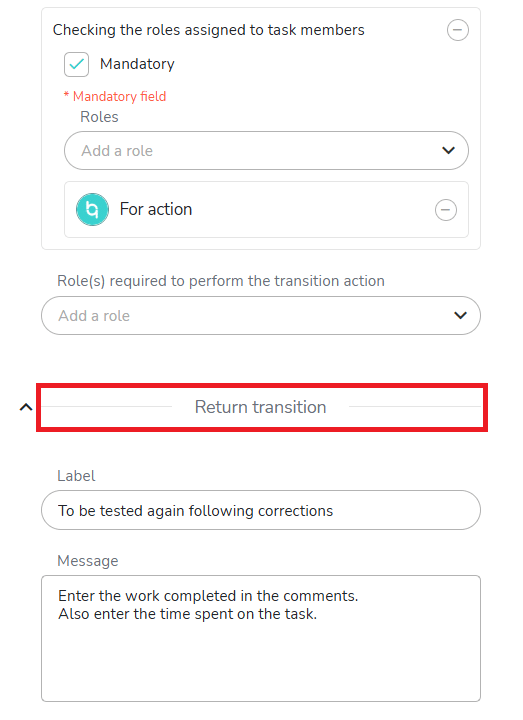
What actions are possible? A drop-down menu offers the following choices: enter a comment, enter achieved time, enter initial time, enter planned time, add an attachment, enter a special field, send a notification, and check the roles assigned to task members:
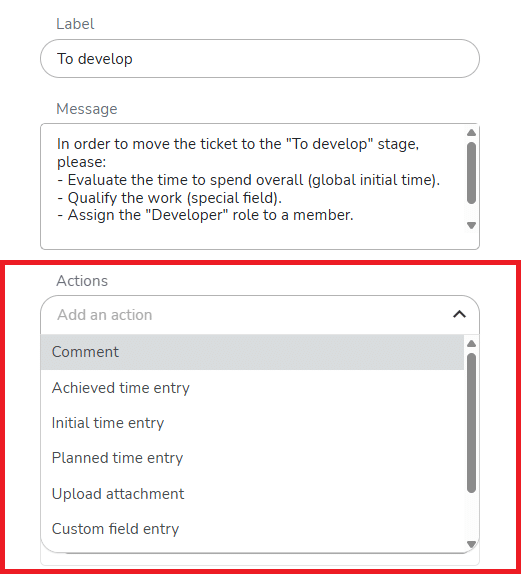
You can select one or more actions.
Once you’ve selected an action, you can make it mandatory using the checkbox.
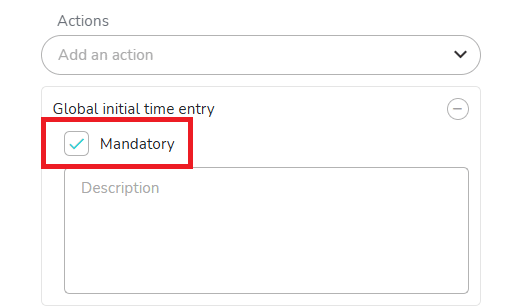
The mandatory nature of the action blocks the process from moving to the next step until it is completed. Therefore, non-mandatory actions are not blocking; they are simply recommended.
Please note that regarding mandatory actions, there is no control over who performs the action or when it was performed. For example, if you request a comment to move to the next step, and a comment has already been entered by you or someone else, the mandatory action is considered completed. This also applies to roles, time entries, etc. It is therefore the user’s responsibility to properly complete the requested actions, hence the importance of clearly explaining them in the message presented above.
The description field is available to document the action chosen in the workflow. It will not be visible to the user in the task’s side panel.
The field “Role(s) required to perform the transition action”
You can select one or more roles that will be required by the member wishing to perform the transition action, i.e., move the task to the next step in the workflow.
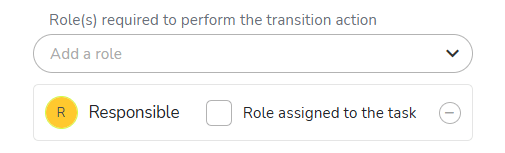
In this case, even if all mandatory (or optional) actions are completed, only members with one of these roles set as the default role on the project will be able to move the task to the next step by clicking the “Confirm” button in the task’s workflow side panel.
This information is not visible in the task’s workflow side panel.
Validating the transition settings
Once you’ve made your choices, click the “Confirm” button at the bottom of the window to save your transition settings.
Configuring the steps
When you click on a step, the following settings window appears:
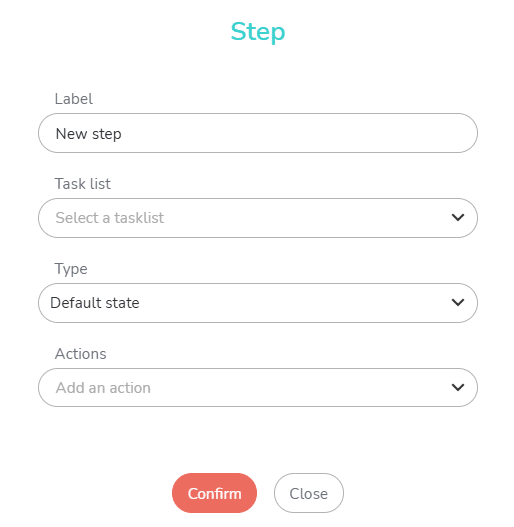
The “Label” field
The label is the name of your step.
The “Task list” field
The task list field allows you to link the step in question to a task list in your project. This is not mandatory. This option is particularly useful in a Kanban process, where each task list in the project represents a step in the process. For example, in the project below, tasks are moved from one task list to another as the process progresses:
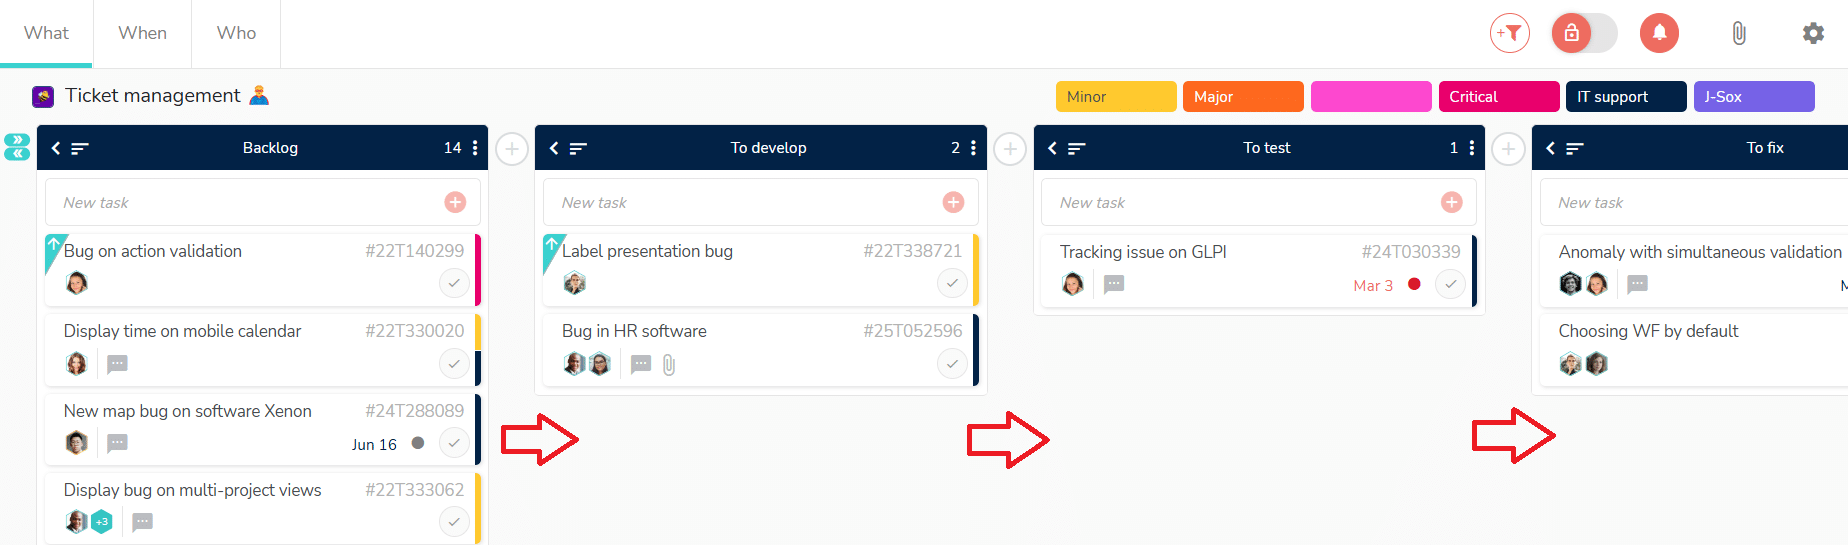
A task will be qualified in the backlog, then moved to “To develop,” then to “To test,” and so on.
If the workflow steps match the task lists and the conditions are met, the tasks will automatically move from one task list to another with each transition validation.
Here, for example, the “To test” step is attached to the “To test” task list:
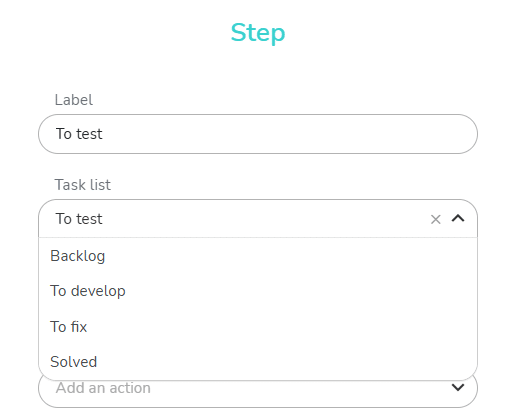
Therefore, any task moving from a previous step to the “To Test” step will automatically be placed in the task list, also called “To Test.”
The “Type” field
Next, you can choose the transition type between “Default State” or “Bidirectional State.” The “Default” step is a step that serves as a simple transition between a previous step and a next step. The “Bidirectional” step is a “dead-end” step in the workflow: there is no next step. The task will then return to the previous step after completing the actions required in that step.
For example, the “To fix” step is a bidirectional step:
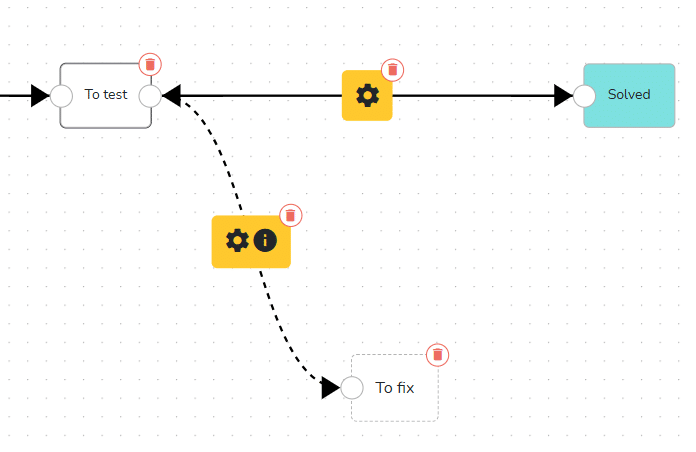
Indeed, a completed task (e.g., an IT development) has to be tested in the “To test” step. If the test is negative, the task then moves to the “To fix” step. Once this work has been corrected, the task returns to testing. When the test is successful, the task can reach the end of the workflow, namely the “Solved” stage.
The choice of bidirectional type has an impact on the transition: it also becomes bidirectional, with possible configurations for both the outbound and return journeys:
The “Actions” field
Finally, you can also choose one or more actions to perform on the step. These are the same actions as those proposed in the transition, excluding the “Notification” action and the “Assign roles to task members” action (these two actions are intended to prepare the transition to the next step, hence their placement only on transitions). You can also make them mandatory or leave them optional.
Activating the Workflow
When you have finished structuring and configuring your workflow, don’t forget to click the “Save” button in the top right corner.
Then, when you want to make the workflow usable in the project, click the “Activate” button:

If you wish, you can then deactivate the workflow at any time by clicking the same button.
Configuring multiple workflow versions
The “New version” button in the top right corner allows you to launch a new version of the workflow.

This allows you to test changes to a workflow already configured on a separate version, and then choose the best version.
To switch between versions, choose from the drop-down menu with the version numbers:
